No products selected.

- Car Rental System
- Survey Manager
- Maps Inserter for Google Maps
- Advanced Form to Email PHP
- Advanced Form to Email ASP
- Posts Carousel
- Comments Inserter Widget for Facebook
- Mobile Optimize
- Photoshow
- Smart List
- Light Date Picker Calendar
- Touch OnOff
- Touch Button
- Light Edit
- Advanced Form to Excel PHP
- Text Tools
- Advanced Database Relational List
 Product Info
 Demo / Video / Faq
 Instant Download

Paypal: You will return from Paypal to a direct download page. A copy of your personal donwload link will be sent to the email address used for payment.
Be sure to check also your spam/bulk mail folder.
Advanced Form to Excel PHP
The Advanced Form to Excel PHP is a Dreamweaver extension for automatically saving the data from a form into a CSV file and sending a copy of those data to an email address.
It has a single step configuration step that makes easy its use and includes a lot of configuration options to make it work exactly according to your needs. For example, you may want use only the CSV/Excel part or only the email part, you can visually add multiple email recipients, customize the form subject and from address, automatically process file uploads including which type of uploads you will accept and if the upload should be sent as attachment into the email and many other useful configuration options, as mentioned above: all can be done into a single insertion step from the Dreamweaver menu.
FEATURES
These are the main features:
- Saves the form data into a CSV file: The CSV file can be opened in Excel and easily imported into other systems.
- Sends the form data to one or various email addresses.
- Automatic identification of the form fields: You are free to add/remove fields from your form and those changes will be automatically detected.
- Allows sending a "thank you/confirmation" message to the user that fill in the form.
- Compatible with all character settings.
- Compatible with all locale settings and CSV/Excel formats.
- Lets you to exclude fields from the email and Excel file.
- Optionally gets additional information about the request, like IP address, browser used,...
- Multi-domain license: You can use it in all your websites and in the websites that you create for your customers.
- Automatic server settings detection: Works in most environments without requiring adjusting the configuration settings. In some servers you may have to specify the email delivery gateway to send the emails.
- Includes a tool to view the CSV online (without downloading it) and delete selected rows.
- Allows editing the configuration settings at any time.
- Several configuration options supported (details below).
REQUIREMENTS
- Dreamweaver MX (6) or later version (MX, MX 2004, DW 8, CS3, CS4, CS5, CS6, CC ...)
- Your web server must support PHP scripts.
- You should set writing permissions into the folder "DEX_Form2ExcelPHP/saved_forms".
INSTALLATION
To install the extension in your Dreamweaver, double-click the downloaded ".MXP" file. This action will load the Adobe Extension Manager and will install the extension.
If the Adobe Extension Manager is not automatically loaded, then start it manually and use the option "File >> Install Extension" to install the downloaded .MXP file.
After this step, restart Dreamweaver and you will find the option "Insert Advanced Form to Email PHP" in the Dreamweaver's menu "Commands".
USE
You can apply this extension to any existent form. Feel free to design your form adding any fields and formatting, the Advanced Form to Excel PHP will identify the fields automatically, even if the fields are changed after applied the extension on the form.
To apply the extension, first click any field into the form to select it; then go to the Dreamweaver menu >> Commands >> Insert Advanced Form to Excel PHP. The following configuration panel will appear:
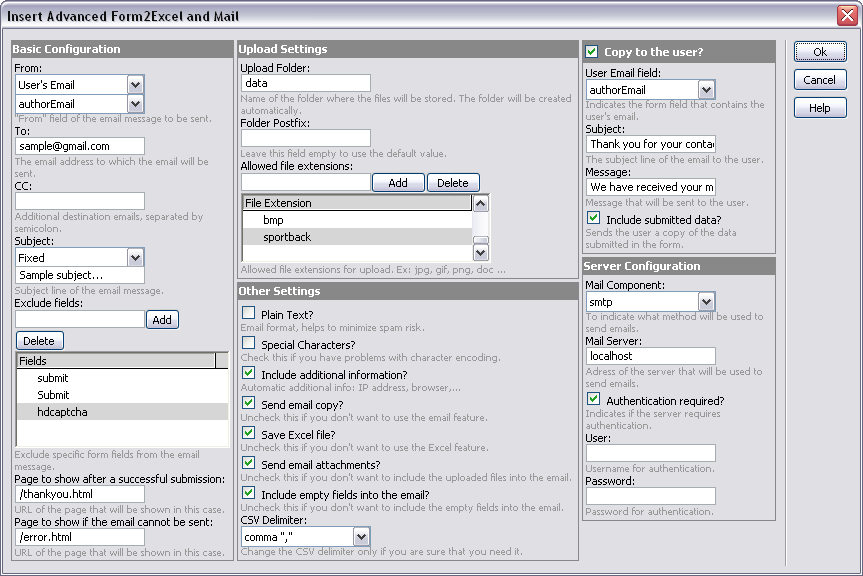
Setup fields in this window are:
- Basic Configuration:
- From: Indicates the contents of the "from" field of the email message to be sent. It can be a fixed email address (option Email Address) or the email of the user who fills in the form (option Users Email). In the field nearby you will be able to indicate the fixed "from" or select the field of the form in which users will enter their email address.
- To: Indicates the email address to which the email will be sent.
- CC: Optionally, indicates to which additional email addresses you wish to send a copy.
- Subject: Indicates subject line of the email message, which can be either fixed (Fixed option) or a form field value (option "From field"). In the field nearby you will be able to write the fixed subject or select the form field which will be used as subject line.
- Exclude Fields: here you can exclude specific form fields from the email message, for example, fields for captcha verification or other control fields.
- Page to show after a successful submission: URL of the page that will be shown to the user after the email is sent through: usually, the "thank you" page.
- Page to Show if the email cannot be sent: URL of the page that will be shown if the email can not be sent. Usually this page notifies the user and provides additional instructions.
- Upload Settings:
- Upload Folder: The CSV file and attachments will be saved into a folder located into the folders "DEX_Form2ExcelPHP/saved_forms". This field allows you to specify the name of that folder.
- Folder Postfix: A postfix is added automatically to the folder name to avoid unauthorized downloads. The default value is a calculated postfix unique for your website, however if you prefer you can fix your desired postfix here.
- Allowed file extensions: Allowed file extensions: Specify here which type of files you will allow to upload, if any.
- Other Settings:
- Plain Text?: Sometimes, sending the message as "plain text" minimizes the risk of being classified as spam. Do check this option if you are using servers of Yahoo Hosting Services.
- Special Characters?: Check this if you have problems with character encoding.
- Include additional information?: Indicates if you want to include the additional information (User IP address, browser, ...) into the CSV file and into the email.
- Send email copy?: Select this if you want to use the email feature of the extension.
- Save Excel file?: Select this if you want to use the CSV/Excel feature of the extension.
- Send email attachments?: Select this if in addition to saving the attachments on the server you want also to send the files attached into the emails.
- Include empty fields into the email?: Select this if you want to include the non-filled fields from the form into the emails.
- CSV Delimiter: The standard separator for CSV files is the comma. However, some regional locale settings use different separators like the semicolon or tabs, or you may prefer some specific separator to make it easier to import from other application. This configuration field lets you to select the CSV field separator. If you are not sure about this setting then let there the default value (comma).
- Copy to the User?: Indicates if you wish to send confirmation of receipt to the user, with the following setup fields:
- User Email Field: Indicates which of the form fields will contain user's email address.
- Subject: To indicate the subject line of the email to the user.
- Message: To indicate the message that will be sent to the user. (Ex: "We have received your message. Thank you!").
- Include submitted data?: To indicate if you wish to send the user a copy of the data submitted in the form.
- Server Configuration:
- Mail Component / Method: To indicate which method will be used to send emails. If not sure, select "autodetect".
- Mail server: If you chose SMTP or if your server has a different address for the server that sends emails, then indicate here the address of the server for emailing.
- Authentication required?: Indicates if the server requires authentication to send emails. If you check this option, you will be able to enter the username and password. Most hosting providers do not require authentication to send emails, so if you are not sure, do not check this option.
After clicking the "Ok" button the Advanced Form to Excel PHP will be applied into your form and you are ready to upload the page that contains the form and the folder "DEX_Form2ExcelPHP" that was generated into your site (including all the contents of that folder).
Important step: After uploaded the files to your web server, you need to set writing permissions to the folder "DEX_Form2ExcelPHP/saved_forms" since that folder will be used to automatically generate the CSV files and to save the uploaded files.
After purchasing, the downloaded file will contain the MXP file (Installer for the Dreamweaver extension) and a folder named "Utils (optional)" where you will find the online CSV browser and a small tool to restore the permissions (if needed). Each one of these utilities includes a "readme.txt" file with the instructions.
Instant Download
$59.99
Paypal: You will return from Paypal to a direct download page. A copy of your personal donwload link will be sent to the email address used for payment.
Be sure to check also your spam/bulk mail folder.